|
|

Spectacle Optics Help DocumentationBy Darryl Meister Revised 01 May 2010 This is online help documentation for the Spectacle Optics suite of optical design and analysis tools. Program InstallationThe program file is available for download here. Download the program to disk, unzip the program files, run the setup.exe program file to install the software, and then find the actual program short-cut to start the actual program. The user can choose between six different optical analysis modules. 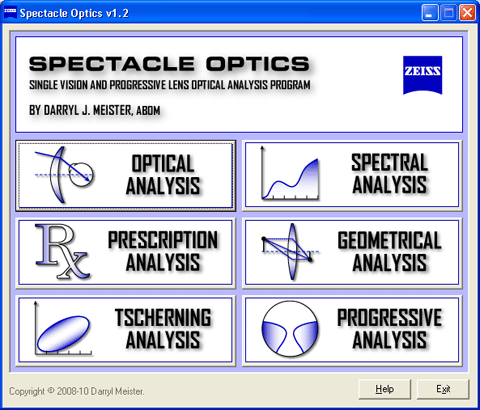 Optical AnalysisLens geometry is calculated for the specified lens, including the center thickness, edge thickness, weight, plate height, and weight. Peripheral or off-axis optical performance is calculated for the specified angle of ocular rotation, including the tangential power error, sagittal power error, oblique astigmatism (that is, tangential error − sagittal error), mean power error (that is, ½ tangential error + ½ sagittal error), rotatory distortion, and lateral chromatism, using Jalie's ray-tracing sequence. A vertical cross-section of the lens is also displayed along with the position of the eye. Additionally, a graph of the tangential (T) and sagittal (S) power errors is displayed, indicating the off-axis performance at intersection points across the entire back surface of the lens. 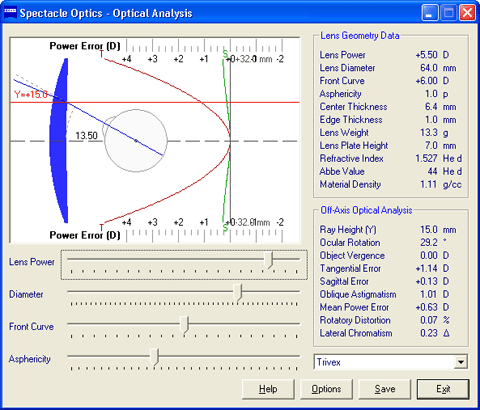
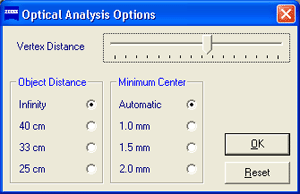
Note that, in higher prescription powers, off-axis performance may become erratic at extreme viewing angles as the mathematics involved break down. These results should be disregarded. From the Options menu, the following assumptions may also be changed:
 The power of a correctly fabricated spectacle lens will satisfy the intended prescription requirements in the vicinity of the optical axis of the lens. Within this area, which is referred to as the paraxial region, the angles of refraction involved are small and light behaves according to the simplified or first-order approximations of Gaussian optics. When viewing object points through the periphery of a spectacle lens, however, the angles of refraction become large and begin to diverge significantly from their small angle approximations. In this case, the effective focal power of through the tangential meridian (that is, the radial plane from the optical axis) may differ from the power of the lens through the sagittal meridian (that is, the plane a right angle to the tangential plane at any position on the lens). When the tangential and sagittal powers differ, an astigmatic focus is formed instead of a single point focus, resulting in two focal lines perpendicular to each other.  The difference between the tangential and sagittal focal powers, which is essentially equal to the amount of cylinder power between the tangential and sagittal meridians, is referred to as oblique astigmatism; this aberration is analogous to an error in prescribed cylinder power. The average dioptric distance of the tangential and sagittal from the ideal image plane of the eye, or far-point sphere of the eye, is referred to as the power error or mean oblique error; this aberration is analogous to an error in prescribed sphere power. These lens aberrations can be reduced or eliminated by varying the form, or relationship between the front and back curves, of the lens by selecting the appropriate base (or front) curve. Alternatively, the use of asphericity can neutralize the oblique astigmatism produced by the lens through the use of surface astigmatism, which introduces a progressively increasing difference in tangential and sagittal curvature away from the center of the lens. This difference in curvature can offset the difference in focal power at a given angle of view. This allows flatter, thinner lens forms to be utilized without compromising peripheral optical performance. Aspheric surfaces often reduce the height of the lens surface as well, which further reduces either the center thickness of plus lenses or the edge thickness of minus lenses. Chromatic aberration is the difference in focal power or prism between the blue end of the visible spectrum and the red end as a result of chromatic dispersion, or the breaking up of polychromatic (white) light as it passes through the material. Blue light has a higher refractive index than red light in transparent materials. Consequently, blue light is refracted more as it passes through a lens or prism, resulting in lateral chromatic aberration (or chromatism). This effect produces the familiar 'color fringing' that eyeglass wearers often experience in the periphery of high-index lenses. The dispersive property of a lens material is indicated by its Abbe value or constringence. Chromatic aberration is inversely proportional to the Abbe value, so lens materials with lower Abbe values produce more chromatic aberration. Asphericity defines the relative eccentricity of a range of conic surfaces. Conic surfaces are produced by rotating a section of a cone about an axis of symmetry. A value of 1 defines a spherical surface; this is the default value. Values greater than 1 define oblate ellipsoidal surfaces that increase in curvature away from the center of the lens surface. These surfaces are particularly useful for minus-powered lenses that have been significantly flattened. Values below 1 define surfaces that decrease in curvature away from the center of the lens surface. Values between 1 and 0 define prolate ellipsoidal surfaces. A value of 0 defines a paraboloidal surface. Values below 0 define hyperboloidal surfaces.  The lens cross-section and aberration plots can be saved as a bitmap image file. For more information, see Ophthalmic Lens Design. | TOP | Spectral AnalysisSpectral transmittance characteristics are calculated for the selected lens or filter, including the ANSI Z87 shade number, luminous transmittance, ANSI Z87 Blue-Light Hazard transmittance, ANSI Z80 ultraviolet A transmittance, ANSI Z80 ultraviolet B transmittance, the ANSI Z87 Blue-Light Hazard transmittance, and the reflectance of the base (that is, uncoated) lens material. Colorimetry values are calculated for the selected lens or filter, including the dominant hue, saturation purity, x chromaticity coordinate, y chromaticity coordinate, and z chromaticity coordinate in the CIE 1931 color space for the standard (2°) observer. The results are also displayed in four different charts. 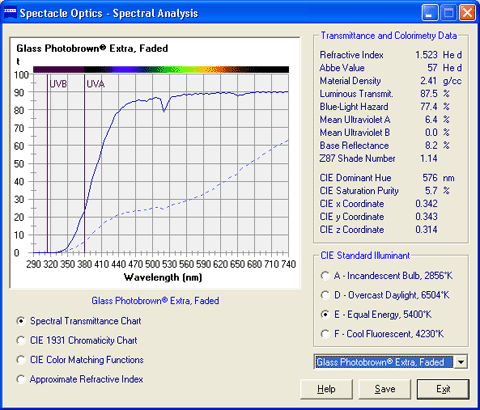
The Spectral Transmittance chart displays the spectral transmittance of the selected lens or filter as a function of wavelength or color across the visible, ultraviolet A (UVA, 315-380 nm), and ultraviolet B (UVB, 290-315 nm) spectra. Note that the luminous transmittance of the lens or filter is the spectral transmittance weighted by the photopic (that is, daylight) sensitivity or relative luminous efficiency of the eye. The eye is maximally sensitive to wavelengths near 555 nm during daylight viewing conditions; therefore, lenses that exhibit greater spectral transmittance near 555 nm also exibit a higher luminous transmittance. 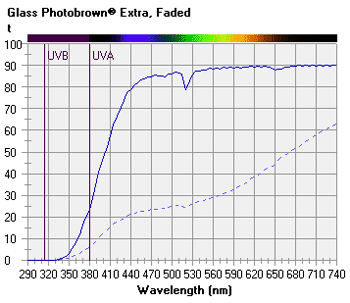 The CIE 1931 Chromaticity chart displays the dominant wavelength (or hue) and chromaticity coordinates of the lens or filter in the CIE 1931 color space based upon the selected illuminant. Quantities of three basic primary colors are required to produce a given color in an additive color system. In the CIE 1931 system, these quantities are represented by three tristimulus values, including an X value for red (at 700 nm), a Y value for green (at 546.1 nm), and a Z value for blue (at 435.8 nm). Each chromaticity coordinate represents the relative contribution of the corresponding tristimulus value, such that: x = X ÷ (X + Y + Z) y = Y ÷ (X + Y + Z) z = Z ÷ (X + Y + Z) The chromaticity coordinates of the selected lens or filter are plotted as a dark red cross. In this color space system, x + y + z = 1, so only two coordinates are required to define a given color (that is, x and y) when brightness is neglected. 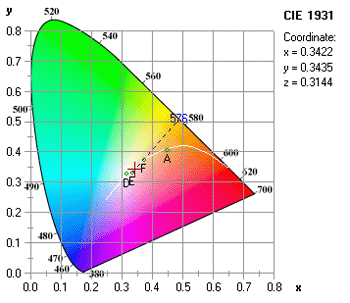 The CIE Color Matching Functions chart displays the three corresponding color matching functions of the lens or filter based upon the selected illuminant. The three color matching functions represent the relative quantity of each CIE primary color (red, blue or green) necessary for a 'standard' observer to match a given wavelength in the visible spectrum when viewed through the lens or filter. Note that the y-function is closely associated with the relative luminous transmittance of the lens, or the transmittance of the lens as weighted by the actual sensitivity of the eye to color. 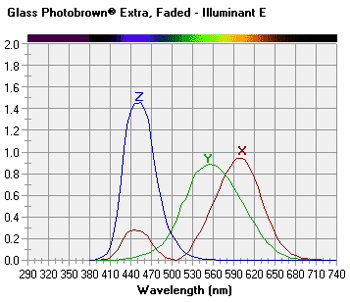 The Planckian locus is also plotted in white. This is the locus of color coordinates for a black body as its temperature is increased. For natural sources that produce light through incandescence, such as the sun and traditional light bulbs, the 'white point' of the source will follow this curve, passing from the lower-frequency reddish hues to the higher-frequency bluish hues of the color space, as the temperature increases. The temperature associated with each white point is referred to as the correlated color temperature. A dominant wavelength line is also drawn from the white point of the selected illuminant through the chromaticity coordinates of the selected lens or filter. The wavelength at which the dominant wavelength line intersects the locus of pure spectral colors along the perimeter of the color space defines the dominant hue or color of the lens. The ratio of the distance between the white point and chromaticity coordinate to the distance between the white point and dominant wavelength defines the saturation (or excitation purity) of the lens. Note that, for a 'clear' lens, saturation will approach zero. Further, the dominant wavelength is not displayed for colors along the bottom purple boundary, between red and blue, since these colors represent non-spectral hues. The Approximate Refractive Index chart displays the approximate refractive index of the lens or filter as a function of wavelength or color. The refractive index for each wavelength is calculated using the first two terms of a Cauchy polynomial. Because of the dispersive properties of transparent materials, blue light has a higher refractive index than red light. The dispersive property of a lens material is indicated by its Abbe value or constringence. Lens materials with lower Abbe values will therefore exhibit a greater difference in refractive index between the red and blue ends of the visible spectrum. 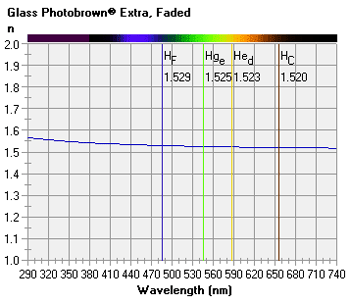 The reference wavelength used to calculate the 'stated' or mean refractive index of lens materials in the United States corresponds to the Helium (He) d Fraunhofer line at 587.56 nm. Some countries utilize a reference wavelength that corresponds to the Mercury (Hg) e line at 546.07 nm. The Abbe value is calculated using additional wavelengths corresponding to the Hydrogen (H) F line at 486.13 nm and the Hydrogen (H) C line at 656.27 nm, which represent the blue and red ends of the visible spectrum, respectively. The approximate refractive index values for these wavelengths are displayed. The Abbe value (ν) is related to the refractive index of the lens material for each of these three wavelengths (that is, Hed, HF, and HC) by: ν = (Hed − 1) ÷ (HF − HC) Each chart can be saved as a bitmap image file. For more information, see Spectral Transmittance and Color. | TOP | Prescription AnalysisA compensated prescription is calculated that corrects for the prescription optical effects of vertex distance, pantoscopic lens tilt, facial wrap (that is, face-form tilt), decentration, and vertical imbalance at the reading level (if any), along with the paraxial spectacle magnification for the manipulation of iseikonic lenses intended to reduce aniseikonia, or unequal image sizes. The lens centration geometry is also displayed in a lens centration diagram along with the approximate minimum blank size (MBS). 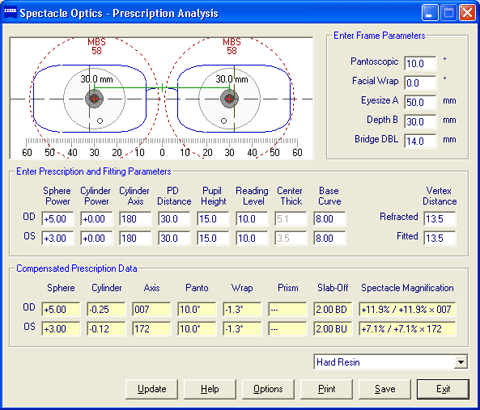
From the Options menu, the following assumptions may also be changed:
Note that, if the depth or 'B' measurement of the frame is changed, the Pupil Height value should be adjusted accordingly. The layout geometry and pertinent data are displayed in a lens centration diagram. The location of the optical center of each lens is represented by a red cross. The location of the pupil center of each eye is represented by the center of each eyeball drawing. The vertical location of the reading level of each lens is represented by a small black circle. The outline of each lens diameter is represented by a dashed burgundy circle. The optical effects of fitting geometry on the power of the lens as perceived by the actual wearer have been well documented. Increasing the vertex distance of a lens will result in an increase in plus power or a decrease in minus power. Conversely, decreasing the vertex distance will result in a decrease in plus or an increase in minus power. Additionally, tilting a spherical lens will result in an increase in sphere power and the introduction of unwanted cylinder power of the same sign as the sphere power and oriented at an axis coincident with the axis of lens tilt (that is, at axis 90° for facial wrap and at axis 180° for pantoscopic tilt). Tilting a lens with cylinder power results in more complex optical interactions, particularly when both facial wrap and pantoscopic tilts are involved. Tilting a lens also introduces an unwanted prismatic effect due to the thickness and curvature of the lens. For facial wrap, this prismatic effect results in unwanted horizontal prism imbalance, which can be eliminated through the use of horizontal prism of similar magnitude in the opposite direction. Further, even if the frame has no tilt, decentration of a meniscus lens, which occurs along an arc, will result in some degree of lens tilt. Thin lens approximations are utilized to compute the prescription necessary in order to compensate for the effects of lens tilt. Please note, however, that the results of this prescription compensation apply only to single vision lenses. The results will be less accurate for progressive lenses (particularly lenses with prism-thinning), high-powered lenses, and lenses with prescribed prism, and should therefore be treated as merely informative. The vertical prism imbalance at the indicated Reading Level is also calculated and displayed in the Slab-Off Prism fields for prescriptions with anisometropia. The default reading level is 10 mm. For prism imbalance values below 1.5 prism diopters, which is typically considered the threshold value for vertical imbalance compensation, the results are discarded. For prism imbalance values above 1.5 prism diopters, the vertical prism compensation at near is displayed for both lenses. For conventional slab-off grinding, choose the Base Up prism compensation. For reverse slab-off grinding, choose the Base Down prism compensation. The centration diagram can be saved as a bitmap image file. The prescription form information can also be printed. | TOP | Geometrical AnalysisImage size and location (L') are calculated for the specified lens, mirror, or surface optical element with an equivalent power and object distance (L) from the center of the optical element set by the user. Linear magnification (×), or the ratio of the image size to the original object size, is calculated for a given pair of conjugate image and object distances. The numerical results are displayed along with a graphical representation of the ray tracing construction. The cardinal points of the optical element are calculated, including the primary focal and secondary points (F and F'), the location of the first and second principal points (P and P'), and the location of the first and second nodal points (N and N'). The location of each point along the optical or principal axis is also displayed relative to the origin (0) of the coordinate system, which represents either the physical center of the lens for lens optical elements or the pole of the surface for mirror and surface optical elements. 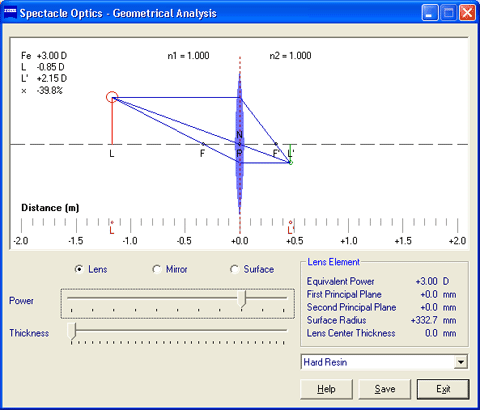 The equivalent power (FE) of each optical element is equal to the vergence of the secondary focal point (F') at the plane of the second principal point (P') of the optical element. This also represents the image vergence produced by the optical element at the plane of the second principal point (P') for an infinitely distant object. The object is displayed in red, and the image is displayed in green. Virtual objects and virtual images are displayed using dotted lines. The object (L) and image (L') locations are also displayed along the bottom scale. The following convention is utilized in the ray tracing construction:
For Lens optical elements: 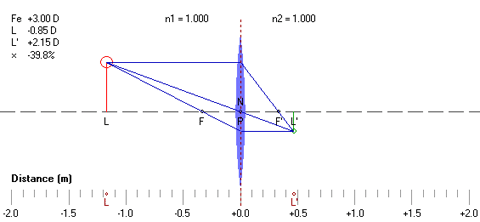 Either a biconvex (for plus power) or biconcave (for minus power) lens with equal front and back surface powers is defined based upon the specified equivalent power. The following additional variables may also be changed for lens optical elements:
The front (left side) and back (right side) surface interfaces of the lens are both bounded by air (n1 = n2 = 1.000). The equivalent focal power (FE) of a lens optical element with a given refractive index (n), center thickness (t) in meters, front surface power (F1), and back surface power (F2) is given by: FE = F1 + F2 − t/n × F1×F2 Note that the equivalent power of a lens optical element of finite thickness will differ from the vertex power of the lens. For Mirror optical elements: 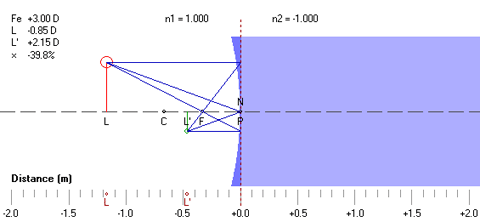 The mirror interface is bounded on the left side by air (n1 = 1.000) and on the right side by a virtual reflection space equal to minus;n1 (n2 = −1.000). The equivalent reflective power (FE) of a mirror optical element with a radius of curvature (r) is given by: FE = −2×n1 ÷ r where n1 = 1.000 in air. For Surface optical elements: 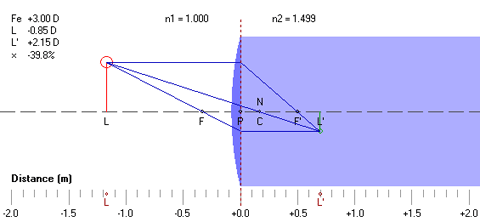 The following additional variable may also be changed for surface optical elements:
The surface interface is bounded on the left side by air (n1 = 1.000) and on the right side by a medium with a refractive index equal to the index of the selected material (n2 = n). The equivalent refractive power (FE) of a surface optical element with a given refractive index (n) and radius of curvature (r) is given by: FE = (n − n1) ÷ r where n1 = 1.000 in air. Three construction rays are drawn through each optical element in order to graphically construct the image:
Note that, when the object is placed to the right of the optical element or optical element interface, a virtual object (represented as a dotted line) results. The principal points represent the conjugate object and image locations that result in unit (100%) linear magnification. Since these two planes are conjugate to each other, a ray of light directed at the first principal plane (P) will appear to exit the second principal plane (P') at the same distance from the optical axis, so that the action of the optical system on incident rays of light may be ignored between these two planes. The secondary focal point (F') of a 'thin' lens equal in power to the equivalent power (Fe) of an optical system will coincide with the secondary focal point (F') of the system when this thin lens is placed at the second principal point (P') of the system for measurements in image space. This thin, equivalent lens will also reproduce the linear magnification of the entire optical system when placed at the second principal point. Similarly, the primary focal point (F) of this same thin lens will coincide with the primary focal point (F) of the system when this thin lens is placed at the first principal point (P) of the system for measurements in object space. The nodal points represent the conjugate object and image locations that result in unit (100%) angular magification. A ray of light directed at the first nodal point (N) will appear to exit the second nodal point (N') at the same angle to the optical or principal axis. The locations of the nodal points are equivalent to the locations of the principal points when the optical element is a lens bounded on both sides by a single medium or refractive index, such as air. A line passing through both nodal points of a lens intersects the optical axis at the optical center of the lens. The locations of both nodal points coincide with the location of the vertex of mirror optical elements. The locations of both nodal points coincide with the location of the center of curvature (C) of surface optical elements. The ray tracing construction can be saved as a bitmap image file. For more information, see Ray Tracing of Thin Lenses. | TOP | Tscherning AnalysisThe two best form front curves required to eliminate either the oblique astigmatism or mean power error aberration are calculated across a range of prescriptions. A graph of these front curves as a function of focal power is also displayed; this graph is commonly referred to as Tscherning's ellipse. These calculations assume that the lens is infinitely thin. 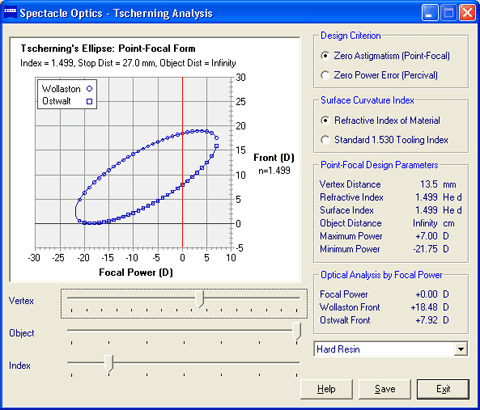
In 1804, William Wollaston invented a series of steeply curved spectacle lenses that eliminated oblique astigmatism. In 1898, Franz Ostwalt invented a flatter series of curved spectacle lenses that eliminated oblique astigmatism. In 1904, Marius Tscherning demonstrated mathematically that were two solutions to the same quadratic equation for the elimination of oblique astigmatism in a thin lens. Wollaston's steeper lens forms represented the negative solution of this equation and Ostwalt's flatter lens forms represented the positive solution. A plot of these two lens forms across the full range of valid focal powers is referred to as a Tscherning's ellipse. 'Best form' or 'corrected curve' spectacle lenses that eliminate oblique astigmatism (that is, tangential error − sagittal error) are referred to as point-focal lenses. 'Best form' lenses that eliminate mean power error (that is, ½ tangential error + ½ sagittal error) are referred to as Percival lenses after Archibald Percival, who first proposed eliminating mean power error in order to place the circle of least confusion of the oblique astigmatism focus at the far point of the eye. The Tscherning ellipse plot can be saved as a bitmap image file. For more information, see Ophthalmic Lens Design. | TOP | Progressive AnalysisOptical performance is calculated for the specified progressive lens at each point across the surface, including the mean power, astigmatism, astigmatism axis, skew distortion, Zernike coma, Zernike trefoil, total Zernike high-order aberration, and prism magnitude. A contour plot of the selected optical distribution is also displayed. Additionally, a graph of the addition power as a function of vertical position along the umbilic of the lens surface is displayed. 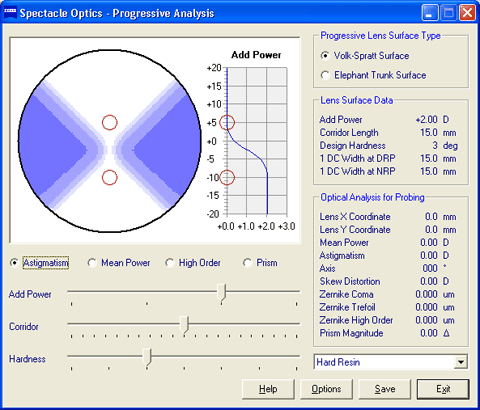
From the Options menu, the following parameters may be changed:
The Astigmatism plot indicates the distribution of unwanted cylinder power across the lens surface in diopters (D). 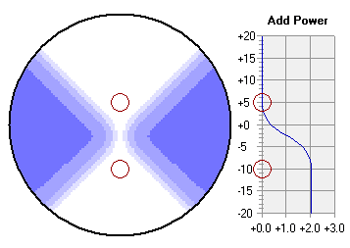 The Mean Power plot indicates the distribution of mean power or the spherical equivalent of the addition power across the lens surface in diopters (D). 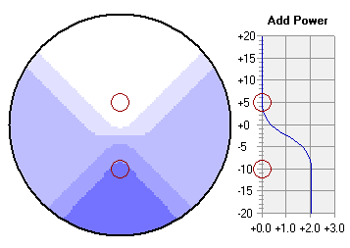 Progressive lenses produce a change in addition power without any visible lines of demarcation by blending the curvature of a flatter distance zone into a steeper near zone using plus-cylinder power oriented at an oblique axis. The use of plus-cylinder produces surface astigmatism and unwanted cylinder power in the periphery and over much of the lens surface. There is, however, a vertical line passing through the center of the viewing zones and the progressive corridor that is free from unwanted surface astigmatism, which is referred to as the umbilic of the lens surface. In the vicinity of the umbilic, the relationship between the increase in unwanted surface astigmatism and the change in addition power is dictated by Minkwitz's theorem, which states that increase in unwanted surface astigmatism away from the umbilic of the progressive corridor is proportional to the rate of change in addition power along the umbilic: Astigmatism Change Lateral to Umbilic = 2 × Addition Change Along Umbilic The rate of change in mean addition power is proportional to the addition power of the lens and inversely proportional to the corridor length of the lens. Therefore, progressive lenses with higher addition powers or shorter corridor lengths produce more rapid changes in unwanted surface astigmatism away from the umbilic of the lens surface as a consequence of Minkwitz's theorem. The High Order plot indicates the distribution of RMS (root-mean-square) Zernike third-order coma and trefoil across the lens surface in microns (mm or 0.001 mm). Due to the variations in mean power and astigmatism that occur over a finite pupil aperture with progressive lenses, these lenses may produce non-negligible levels of certain 'high-order' wavefront aberrations, including the third-order Zernike aberrations of coma and trefoil. The High Order distribution represents the RMS, or root-mean-square, distribution of these Zernike third-order aberrations. The RMS distribution is equivalent to the standard deviation of the wave error. 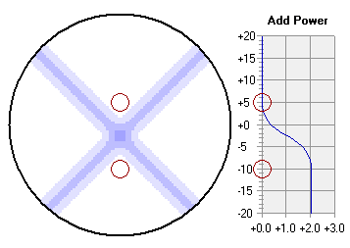 The Prism plot indicates the distribution of total prism (that is, the vector magnitude of the horizontal and vertical prism components) across the lens surface in prism diopters (D). 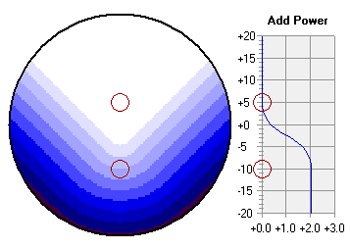 The selected contour plot can be saved as a bitmap image file. For more information, see Optics of Progressive Lenses. | TOP | DisclaimerThis software is intended for educational purposes only, and in no way represents the advice or direction of a licensed professional. Always use judgment when interpreting these results. This software is provided with no warranty, and by utilizing this software the user agrees to hold the author and Carl Zeiss Vision harmless from any liability or legal action that may result from its use. Trademarks
|